Automatic 12V Lead Acid Battery Charger Circuit with Overcharge Protection and Float Charge for up to 10A Batteries
Author: Fayaz Hassan

When the battery reaches the maximum charging voltage defined by the circuit, most battery chargers cease charging it. This 12V battery charger circuit charges the battery at a certain voltage, known as absorption voltage, and after the maximum charging voltage is reached, the charger switches to float voltage to keep the battery at that voltage. The kind of battery influences absorption and floating voltages.
The voltages for this charger are configured for a sealed lead-acid (SLA) 12V, 7Ah battery (up to 10Ah), with an absorption voltage of 14.1V to 14.3V and a floating voltage of 13.6V to 13.8V. Absorption voltage is set to 14.1V and floating voltage is set to 13.6V for safe operation and to avoid overcharging the battery. These settings must be set in accordance with the battery manufacturer's instructions.
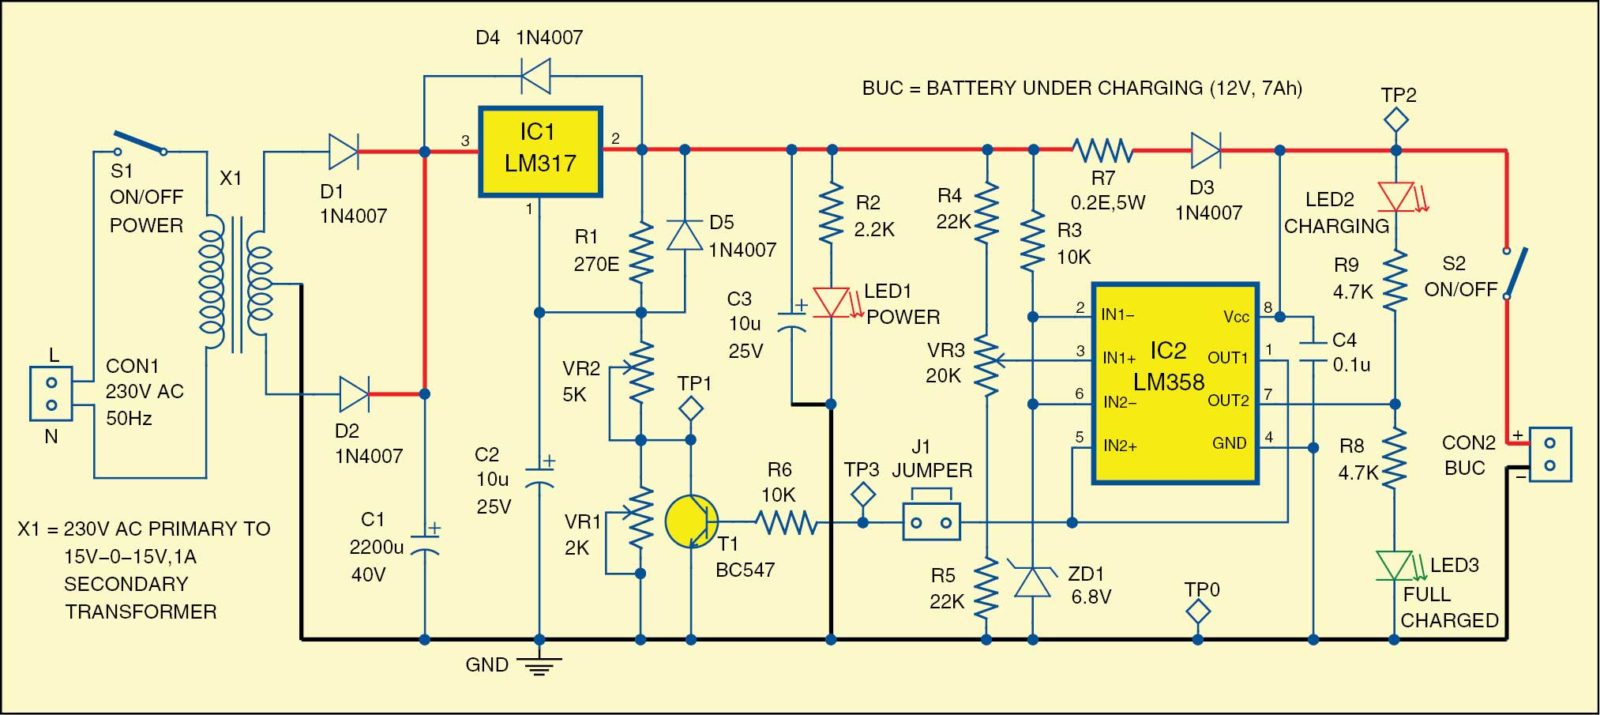
The above figure shows the circuit diagram of the 12V battery absorption and float charger. It's made up of a step-down transformer X1, an adjustable voltage regulator LM317 (IC1), an op-amp comparator LM358 (IC2), and a few more parts. In this circuit, a 230V AC primary to 15V-0-15V, 1A secondary transformer lowers down the mains voltage, which is rectified by diodes D1 and D2 and smoothed by capacitor C1. This voltage is applied to the LM317's input for regulation.
The fundamental circuit is a regulated power supply based on the LM317, with output control via resistance change at adjust pin 1. The LM317 requires a decent heatsink. The LM358 is a dual-operation amplifier that is utilized here to regulate battery overcharging. Capacitor C4 should be as close to IC2 pin 1 as feasible. J1 is the calibration jumper (set-up). Remove the jumper when configuring the charging voltage and reconnect it after calibration.
Parts Used

Initially, in order to set up the circuit, remove jumper J1, turn off S2, turn on S1, and adjust potmeter VR2 to 13.6V at test point TP2. Adjust potmeter VR3 until LED2 starts to light. At test point TP1, set potmeter VR1 to measure 0.5V (the difference between 14.1V and 13.6V). VR2 should be adjusted to read 14.1V at test point TP2.
In this setting, TP2 should read 14.1V when the voltage at test point TP3 is low, and 13.6V when the voltage at test point TP3 is high. Join jumper J1. The charger is now operational. Connect the 12V battery under charge (BUC) to CON2 with the correct polarity. Turn on S2; one of the LEDs from LED2 and LED3 will illuminate (most likely it would be LED2). Check the connections; the battery may be dead if neither of these lights up. Turn on S1 to begin charging. The lighting of LED3 indicates that the battery is fully charged.
Now, don't be concerned if you forget to turn off the charger. The charger is currently on floating voltage (13.6V) and can remain in this charging mode indefinitely.
Note:
- Turn off S2 or disconnect battery connections to minimize battery discharge while not charging, i.e. when S1 is turned off.
- Please ensure that the battery is connected to the correct polarity.
- Because the casing of IC1 should not be linked to the ground, insulation should be used.